Rename Files Based on HTML Title Tags
The “rename files or folders” action type enables you to rename files by searching and replacing through their file names or paths. With the “filter files” feature you can first run a search through the contents of each file and then use (part of) the search match in the search-and-replace through the file’s name. This way you can extract text from the file’s contents and insert it into the file’s name.
As an example, we’ll rename a bunch of HTML files. The new name of each file will be whatever is specified in the <TITLE> tag inside the file. If a file does not have a <TITLE> tag, we use the contents of the <H1> tag instead. If a file has neither tag, it is not renamed.
- Select the HTML files you want to rename in the File Selector.
- Make sure the file format configuration searches through the raw (unconverted) contents of HTML files. The predefined “None” configuration is one that does this.
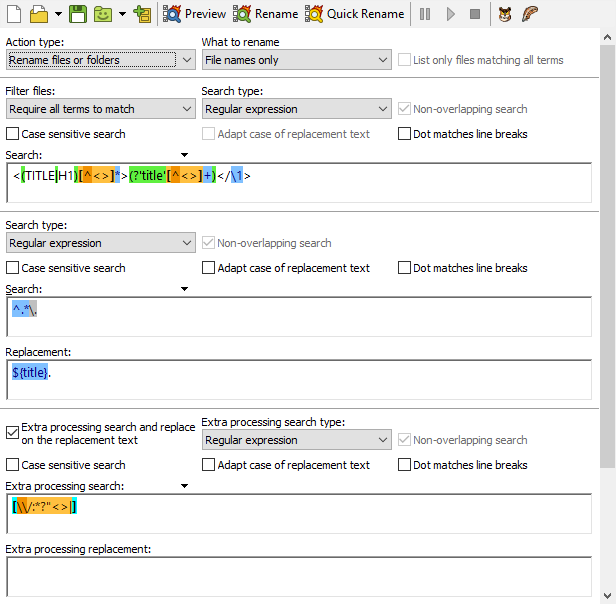
- Start with a fresh action.
- Set the action type to “rename files or folders”.
- Leave “what to rename” set to “file name only”. Our search-and-replace should only change the file’s name.
- Set “filter files” to “require all search terms to match”. Leave the search type as “regular expression”.
- Enter the regular expression <(TITLE|H1)[^<>]*>(?'title'[^<>]+)</\1> in the Search box in the “filter files” part of the action. This regex matches the opening and closing <TITLE> or <H1> tags (whichever pair comes first) and any text between them. The text between them is captured into the named capturing group “title”.
- Enter the regular expression ^.*\. in the Search box in the main part of the action. This regex matches everything up to and including the last dot in the file’s name.
- Enter the replacement text ${title}. to replace the file’s name with the contents of the tag matched by the “filter files” regex. The replacement also puts back the dot that delimits the file’s extension. The extension is not matched by the regex and thus remains unchanged.
- Tick the extra processing checkbox. An additional set of controls for entering search terms appears.
- Use [\\/:*?"<>|] as the regular expression for extra processing. This regex matches any character that is not allowed in file names by the Microsoft Windows operating system.
- Leave the extra processing replacement blank so invalid characters are deleted.
- Set the backup file options as you like them.
- Click the Preview button to run a test.
- If all looks well, click the Rename button to actually rename the files.
Should a file not have a <TITLE> or <H1> tag, then it is filtered out and not renamed. If a file has both a <TITLE> and <H1> tag, or multiple occurrences of the same tag, then only the first tag is used. Once all the regular expressions in “filter files” have found a match, PowerGREP considers the file to meet the filtering requirement. It won’t look for any further matches for the filtering regex.
This action is available in the PowerGREP5.pgl library as “Rename files based on HTML title tags”.