PowerGREP 2 to PowerGREP 3 or 4 Migration Guide
New User Interface
PowerGREP 3 has a completely redesigned interface. PowerGREP 4 uses the same interface as PowerGREP 3, with added features. The screen shots on this page show PowerGREP 2 and 3.
If you’re used to PowerGREP 2, you may feel a little lost when first starting PowerGREP 3. Still, all of PowerGREP 2’s functionality is still there, in pretty much the same way. Only a few things are done differently, and there’s obviously a wealth of new functionality. In terms of power and functionality, PowerGREP 3 stands head and shoulders above all other Windows grep tools.
PowerGREP 2 used a single tabbed panel to define an action. PowerGREP 3 splits the tabbed panel into two panes: the File Selector and the Action pane. In the default view, the File Selector is docked to the left, and the Action pane occupies the remainder of the view. If you have a high resolution monitor, select View|Side by Side Layout from the menu to make PowerGREP 3 use a layout similar to PowerGREP 2, with Action, Results and Editor tiled horizontally.
File Selector
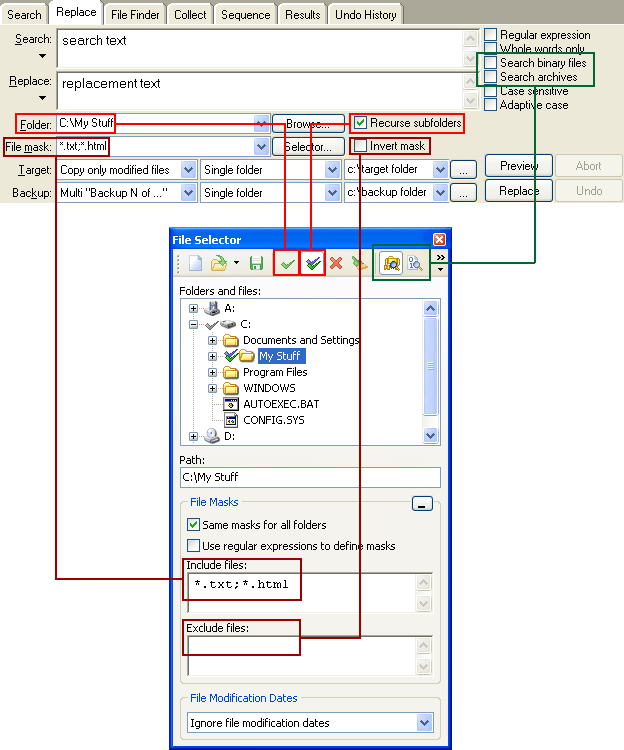
The folder and file mask settings have moved to the File Selector. Instead of typing in a semicolon-delimited list, you now select each folder from the tree and mark it for inclusion. Click the button with the single tick mark on the toolbar to include a folder. If you turned on “recurse subfolders” in PowerGREP 2, use the double tick mark button in PowerGREP 3.
To specify file masks like you did in PowerGREP 2, turn on “same masks for all folders”, and turn off “use regular expressions to define masks”. Enter the list of file masks in the “include files” box. If you turned on “invert masks” in PowerGREP 2, enter the file masks in the “exclude files” box instead in PowerGREP 3.
The “search binary files” and “search archives” options have also moved to the File Selector. You can toggle both options on the File Selector toolbar, or in the File Selector menu.
Action Pane
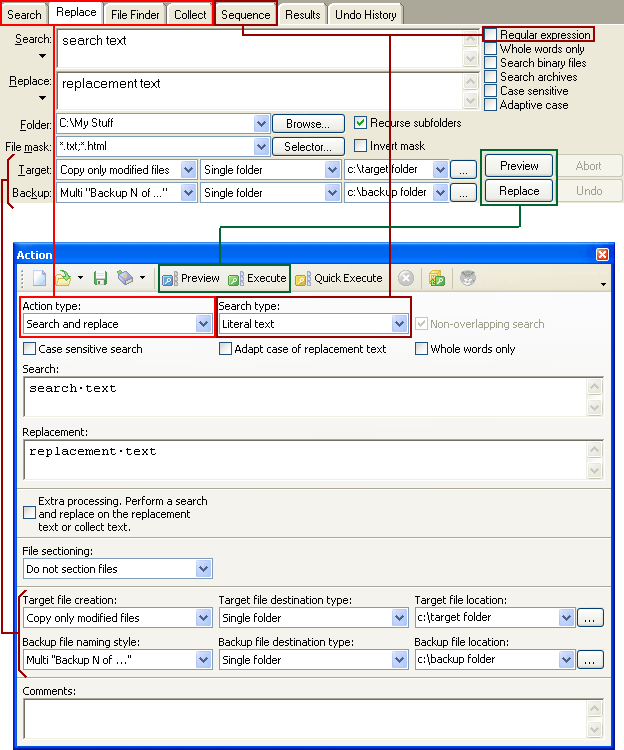
All the other settings from PowerGREP 2 can be made on the greatly expanded Action pane in PowerGREP 3. Instead of clicking the Search, Replace, File Finder or Collect tab, select the action type from the “action type” drop-down list in the upper left corner. PowerGREP 3 does not have a sequence action type. To define a search-and-replace sequence in PowerGREP 3, select the “search-and-replace” action type, and select “list of literal text” or “list of regular expressions” from the “search type” drop-down list. PowerGREP 3 can use sequences with any of the four action types. The “search type” drop-down list also replaces the “regular expression” checkbox.
Sequences
Unlike the sequence editor in PowerGREP 2, the “list of regular expressions” search type in PowerGREP 3 does not have separate case sensitive and dot matches newline options for each regular expression in the list. If you want different options for different regular expressions, turn on case sensitive for the overall action, and turn off dot matches newline. Then you can make a particular regular expression case insensitive by putting (?i) in front of it. To turn on dot matches newline for one regex, put (?s) in front of it.
If you open a PowerGREP 2 sequence action with PowerGREP 3, your sequences will be automatically converted to regular expression lists. PowerGREP 3 will automatically use the mode modifiers explained in the previous paragraph for the conversion.
The new Sequence panel in PowerGREP 4 is something totally new. It allows multiple unrelated actions to be run in sequence. What used to be called a sequence in PowerGREP 2 is now a “list of literal text” or “list of regular expressions” on the Action panel.
New File Formats
PowerGREP 3 uses new XML-based file formats to save actions, results, etc. PowerGREP 3 can read file selection (*.pgf) and action files (*.pga) saved with PowerGREP 2. PowerGREP 3 can also extract file selection and action information from PowerGREP 2 results files (*.pgr). PowerGREP 3 cannot read PowerGREP 2 results. PowerGREP 3 cannot save any files in a format understood by PowerGREP 2.
If you have PowerGREP 2 results files that you still want to read, you will need to keep PowerGREP 2 installed alongside PowerGREP 3. PowerGREP 3 will not overwrite PowerGREP 2 with the default installation options. You can run both at the same time on a single computer.
New Command Line Parameters
PowerGREP 3 supports a different set of command line parameters. All the command line functionality supported by PowerGREP 2 is still available, but many parameters have to be specified differently. If you have automated PowerGREP 2 with batch files or scripts, you should continue using PowerGREP 2 with those batch files and scripts until you can convert them to PowerGREP 3’s new command line parameters. See the PowerGREP 3 help file for more information.
Page last updated: 20 November 2019
Site last updated: 18 January 2024
Copyright © 2002-2024 Jan Goyvaerts.
All rights reserved.