File Selector Reference
In the default layout, the File Selector is visible along the left side of the PowerGREP window. The File Selector displays a tree of folders and files, and enables you to select which files PowerGREP will work on.
Import File Listings
If you already have a text file with the list of files or folders that you want PowerGREP to search through, click the Import button to show the Import File Listings screen. This screen provides a variety of options to tell PowerGREP how to extract paths from the text file. You can tell PowerGREP to import the file listing just once, as a template for creating your own file selection in PowerGREP using the folders and files tree. You can also tell PowerGREP to import the file listing each time you execute the action so the text file becomes the actual file selection instead of the markings in the folders and files tree.
Folders and Files
 The “folders and files” tree view shows all drives, folders and files on your computer, except those hidden by the “hide files and folders” configuration that you can select further down on the File Selector panel. If the tree is too small to work with, click the minimize buttons on the sections below the tree on the File Selector panel. Minimizing those sections allows the tree to take up their space. You may need to minimize all of them if you’re working on a small screen.
The Network node provides access to all network shares on your local area network. PowerGREP does not make any difference between files on your local PC, and files on other computers on your network. Unless you turn on the option to automatically scan the network in the preferences, network servers and shares only appear after you’ve entered a UNC path.
The Clipboard node provides access to the contents of the Windows clipboard. There may be multiple files under this node. When applications copy text to the Windows clipboard, they can make the same text available in different formats. PowerGREP recognizes the plain text, rich text, and HTML clipboard formats. You should mark only one file under the Clipboard node in your action to make PowerGREP search through the contents of the clipboard in one specific format. Which format is best depends on the application that copied the text to the clipboard.
The Editor node provides access to the contents of the Editor panel. There is always one node under this file with the name of the file open in PowerGREP’s built-in editor or untitled.txt if no file is open. Mark this file to make PowerGREP search through the contents of the Editor panel.
To include a specific file in the next action, click on the file in the tree and select Include File or Folder from the File Selector menu, or click the button with the green tick mark on the toolbar, or press the Ctrl+I keyboard shortcut. Alternatively, you can right-click on the file you want to include, and select the Include File or Folder item from the context menu. A green tick mark appears next to the file, indicating it is marked for inclusion in the next action. The toolbar button stays down to indicate that the currently selected file or folder is included.
To include all the files in a particular folder, invoke Include File or Folder on the folder. A green tick mark appears next to the folder. Gray tick marks appear next to the files in the folder. The gray marks indicate the files are indirectly included, because you marked the folder. Files in subfolders of the included folders are not included and do not get tick marks.
To include all files in a particular folder and all of its subfolders, select the folder and invoke the Include Folder and Subfolders command by selecting it from the File Selector menu, clicking the button with the double green tick mark, or pressing Shift+Ctrl+I. A double green tick mark appears next to the folder you marked. The toolbar button stays down to indicate that the currently selected folder is included along with its subfolders. Double gray tick marks appear next to those subfolders. All the files in the marked folder and its subfolders get gray tick marks.
Some files inside an included folder may not get gray tick marks or may get gray X marks. That means they are not included in the action because of the settings below the folders and files tree on the File Selector panel, as described below.
Single gray tick marks also appear next to drives and folders that directly or indirectly contain files that will be searched through. This makes it easy for you to find the files that are being included when most of the nodes in the tree are collapsed.
If a file is included (gray tick) because you marked the folder it is in, you can exclude it from the action by selecting Exclude File or Folder in the File Selector menu, clicking the toolbar button with the red X, or pressing Ctrl+Y. A red X replaces the gray tick next to the file. The toolbar button stays down to indicate that the currently selected file or folder is excluded.
If a folder is is included (double gray tick) because you marked its parent folder, you can exclude it with Exclude File or Folder. This also indirectly excludes all files and subfolders of the excluded folder, removing their gray tick marks. You can still explicitly mark files and subfolders of an excluded folder with a green tick mark to include them.
When you change your mind about including or excluding a file or folder, select it and remove the mark with the Clear File or Folder command in the File Selector menu or by clicking the toolbar icon with the blue strikeout line or by pressing Ctrl+L. The toolbar button stays down to indicate that the selected files and folders are not directly included or excluded. Clearing a file or folder is not the same as excluding it. If you exclude a file or folder, it won’t be search through no matter what. If you clear a file or folder, it may be searched through if you included its parent folder. In that case, a gray tick appears after you clear the green tick or red X.
When you select files or folders in the tree the toolbar buttons with the green tick, double green tick, red X, and blue strikeout change state to indicate the state of the selected files and folders. If all of them are marked with a green tick, double green tick, or red X, then that button is shown in its “down” state. If none of them are marked with any of these 3 marks then the blue strikeout button is shown in its “down” state, regardless of whether any of the files or folders are indirectly included or excluded as indicated with gray ticks or gray X marks. If the selected items have a mixture of marks, then all four toolbar buttons will be in their “up” state. So basically, these four buttons are used to both change the marks on files and folders and to indicate the marks they have.
To remove the marks from a folder and all the files and subfolders it contains, use the Clear Folder and its Files and Subfolders menu item or click the button with the broom on the toolbar. This removes all green and double green tick marks and all red X marks. Gray tick marks will remain if a parent folder is still marked for inclusion.
To start from scratch, select Clear in the File Selector menu or click the button with the empty document. This clears all marks in the folders and files tree, selects all the default configurations, and removes all file masks, file dates, and file sizes.
Searching Through a Single Folder
If you don’t mark any files or folders with ticks or crosses then you can run a quick search through a single folder and its subfolders simply by selecting that folder in the folders and files tree and executing the action on the Action panel. The selected folder is not marked automatically. The next action you execute again depends on the folder selected in the folders and files tree. File masks and date and size filters are still taken into account.
Entering Paths with The Keyboard
Instead of navigating the folder tree, you can directly type in a path in the Path field just below the folder tree. The tree will automatically follow you as you type. You can also paste in a path from the clipboard.
To access files on the network, type in a UNC path. To access the network share “share” on the server “server”, for example, enter \\server\share\ including the final backslash. That share then appears under the Network node in the folders and files tree until you close PowerGREP.
To include the path you entered in the search, press Ctrl+I (Include File or Folder) or Shift+Ctrl+I on the keyboard. To include multiple paths, enter the first path and press (Shift+)Ctrl+I. The text in the Path field will become selected, so you can immediately enter the second path, replacing the first. Press (Shift+)Ctrl+I again to include the second path. To start over, press Ctrl+N to clear the file selection.
Conversion and Extraction
You can select four different configurations that control how PowerGREP deals with certain files.
- File format configuration: Specify which files, if any, should be treated as files (in proprietary file formats) that need to be converted into plain text before they can be searched through. If you select none of the options for a particular file format, then files matching that format’s file mask are excluded from the action. They get gray X marks if they are inside a folder that is included.
- Archive format configuration: Specify which files, if any, should be treated as compressed archives (such as ZIP files), disk images (such as ISO files), or mailboxes (such as PST files) that contain other files or email messages that need to be searched through. Archive formats that you enable appear as folders in the folders and files tree. Archive formats that you disable appear as files. They are excluded from the action. They get gray X marks if they are inside a folder that is included.
- Text encodings to read files with: Specify which text encodings should be used to interpret plain text files.
- Hide files and folders: Specify which files and folders, if any, should be completely invisible in the files and folder tree. Those files and folders cannot be searched through.
Search Through Binary Files
Turn on to search through files that have been configured or detected as binary files by the text encoding configuration. Turn off to skip those files.
Skipping binary files does not exclude them from the search as the automatic detection of binary files is done during the search. Binary files retain their gray tick marks in the files and folders tree. The Results panel indicates skipped binary files in its bottom half, if there are any.
File Masks
With file masks you can include or exclude files by their names or extensions. You can use traditional file masks, or regular expressions. Simply clear or tick “use regular expressions to define masks” to make your choice.
In a traditional file mask, the asterisk (*) represents any number (including none) of any character, similar to .* in a regular expression. The question mark (?) represents one single character, similar . in a regular expression. The file mask *.txt tells PowerGREP to include any file with a .txt extension.
Traditional file masks also support a simple character class notation, which matches one character from a list or a range of characters. To search through all web logs from September 2003, for example, use a file mask such as www.200309[0123][0-9].log or www.200309??.log. To add a literal opening square bracket to a file mask, you need to place it into a character class. The closing square bracket has no special meaning outside of a character class. If you want to add a literal closing square bracket to a character class, place it immediately after the opening square bracket. So the file mask *[[][0-9]].txt matches file names like whatever [1].txt. In this file mask, [[] is a literal opening bracket, [0-9] is a single digit, and ] is a literal closing bracket.
You can delimit multiple file masks with any mixture of semicolons, commas, and line breaks. To search through all C source and header files, use *.c;*.h. To add a literal semicolon or comma to a file mask, either place the semicolon or comma between square brackets, or place the whole file mask between double quotes. The file mask *[,]*.txt;"*;*.doc" matches all .txt files that have a comma in their name, and all .doc files that have a semicolon in their name.
If you choose to use regular expressions to define masks, you have the full regular expression syntax at your disposal. Semicolons, commas, and line breaks are treated as delimiters between multiple regular expressions. To add a literal semicolon or comma to a mask defined by a regular expression, escape it with a backslash, or place it inside a character class.
One important difference between traditional masks and regular expressions is that the traditional mask must always match the whole file name, while a regular expression only needs to match part of a file name. The mask *.txt matches joe.txt, but not joe.txt.doc since the latter does not end in txt. You could use the mask *.txt* to match both. The regular expression .*\.txt, however, matches both file names. In fact, \.txt has exactly the same effect. Use the regular expression \.txt$ with the end-of-string anchor to match only files with a .txt extension.
Include Files And Exclude Files
When you do not specify any file masks for a folder, all files in that folder are included. If you specify an inclusion mask, only files that match the inclusion mask will be included. The other files lose their gray tick marks. Note that *.* tells PowerGREP to search through all files with a dot in the file name, or files that have an extension. If you want to search through all files, leave the file mask blank instead of specifying *.*.
If you specify an exclusion mask, all files matching the exclusion mask are excluded form the next action. Those files get gray X marks if they are inside a folder that is included. The exclusion mask takes precedence. If you specify both masks, files matching both are not searched through.
Masks only apply to files that were included because you marked the folder containing them. If you directly mark a file with a green tick mark then file masks do not apply to that file and it is always searched through.
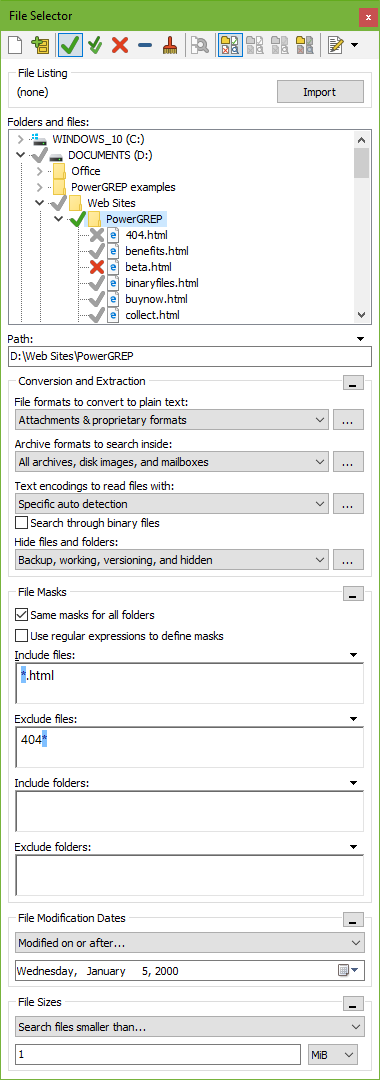
In the screen shot above, the folder “PowerGREP” was marked for inclusion with Include File or Folder, as evidenced by the green tick next to it. The file “404.html” is excluded because it matches the exclusion mask, indicated by the gray X mark. The file “beta.html” is excluded with the Exclude File or Folder command, indicated by the red X mark.
By default, the same file masks are used for all folders that you marked for inclusion. If you want to use different marks for different folders, deselect the “same masks for all folders” option. After that, editing a mask will only edit it for the highlighted folder. If you turn on “same masks for all folders” again, the masks for all folders are immediately set to those displayed in the File Selector.
Example: Search through file names
Include Folders and Exclude Folders
You can also use file masks to include or exclude folders based on their names. If you use the double tick mark to include a folder with its subfolders, and you specify a file mask for “include folders”, then files within the marked folder or its subfolders are only included if the name of their immediate parent folder matches the “include folders” mask. Those files retain their gray tick marks, while the other files lose their gray tick marks. This also applies to files directly inside the folder that you marked with the double tick mark. Other settings such as “include files” can further reduce the list of files that are searched through, but never add files to the search if their immediate parent folder failed to match “include folders”.
If a folder is included along with its subfolders (double tick mark), and you specify a file mask for “exclude folders”, then the folder that you marked and any subfolders of it are excluded from the search if their name matches the “exclude folders” mask. Files and folders inside those excluded folders are all excluded, even if they match “include folders” or “include files” masks. The excluded folders get gray X marks, and the files and folders inside them lose their gray tick marks. File and folders inside folders excluded by “exclude folders” can still be included by marking them for inclusion with a green tick mark.
If you mark a folder to be included without its subfolders (single tick mark), then the files in that folder are included in the search, regardless of whether or not that folder matches the “include folders” mask or the “exclude folders” mask.
Folder names normally do not have extensions. Do not include a dot in file masks for folder names unless you specifically want to require a dot in the folder’s name.
File Masks on Relative Paths
Normally, file masks do not include any backslashes. They are applied to the name of the or folder only. But PowerGREP allows you to use backslashes in file masks. When you do, the file mask is compared with the file’s path relative to the marked folder. If you marked “C:\My Documents\My Stuff”, for example, then the relative path of “C:\My Documents\My Stuff\Web Site\about.html” is “Web Site\about.html”.
File Masks and Archives
PowerGREP treats archives that are enabled in the archive format configuration as (compressed) folders. File masks such as *.zip are applied to files rather than to folders. That means you cannot set “include files” or “exclude files” to *.zip to control whether PowerGREP searches through .zip files. Instead, select or edit an archive format configuration to enable only those archive formats that you want to search through and which file extensions PowerGREP should recognize as archive formats.
If you want to search through specific archives based on their names, select an archive format configuration that enables the format of those archives. Then enter the masks that match the names of the archives you do or do not want to search through in “include folders” or “exclude folders”.
This rule does not apply to disabled archive formats when you execute a list files action without a search text, a file name search action, or a rename files action. In those situations, PowerGREP treats archives as ordinary files if they use an archive format that you configured not to be searched inside of. File masks such as *.zip do work in that situation, and the “list files” action will list the zip files themselves in the results.
File Modification Dates
After marking files and folders and specifying file masks, you can further reduce the files that will be searched through by filtering them by their modification dates. The date filter is only applied to files that are indirectly included because you marked their folder with a single or double green tick mark. Files that you marked directly with a green tick mark ignore the date filter. Files that fail the date filter are indicated with gray X marks.
PowerGREP can treat modification dates in several ways:
- Modified during the past...: Only search through files that have been modified in a certain number of past hours, days, weeks, months or years.
- Not modified during the past...: Only search through files that were not modified in a certain number of past hours, days, weeks, months or years.
- Modified on or after...: Only search through files last modified on or after a specific date. Files last modified on the date you specify are searched through.
- Not modified on or after...: Only search through files that were last modified before a specific date. Files last modified on the date you specify are searched through.
- Last modified between...: Only search through files that were last modified on or between two specific dates. Files modified on those dates are searched through.
- Not last modified between...: Only search through files that were last modified before a specific date or after another specific date. Files modified on those dates are searched through.
When specifying a time period, PowerGREP starts counting from the start of the current period. If at half past three, for example, you tell PowerGREP to search though files modified during the last two hours, then PowerGREP searches through files modified at or after one o’clock, two hours before the start of the current hour.
Weeks start on Monday. If you tell PowerGREP to search through files modified during the last week on Wednesday the 14th, PowerGREP will search through files modified on or after Monday the 5th. The only exception to this rule is when you limit the search to a number of weeks on a Sunday. Then, PowerGREP starts counting from the next Monday. The same search on Sunday the 18th will have PowerGREP search files modified on or after Monday the 12th.
File Sizes
You can also further reduce the files that will be searched through by filtering them by their sizes. The size filter is only applied to files that are indirectly included because you marked their folder with a single or double green tick mark. Files that you marked directly with a green tick mark ignore the size filter. Files that fail the size filter are indicated with gray X marks.
Use the file size setting to specify that you only want to search through files smaller than or larger than a certain size, or files with a size between two sizes. You can specify file sizes in seven different units:
- bytes
- kB: kilobytes (1,000 bytes)
- MB: megabytes (1,000,000 bytes)
- GB: gigabytes (1,000,000,000 bytes)
- kiB: kibibytes (1,024 bytes)
- MiB: mebibytes (1,048,576 bytes)
- GiB: gibibytes (1,073,741,824 bytes)