 The first step in running a search with PowerGREP is to select the files you want to search through in the File Selector.
The first step in running a search with PowerGREP is to select the files you want to search through in the File Selector.
1. By default, “hide files and folders” is set to “backup, working, versioning, and hidden”. This makes files that look like backup copies, working copies or version control copies as well as hidden files completely invisible to PowerGREP and its File Selector. If you need to search through such files, select a different “hide files and folders” configuration first. Otherwise, leave this option unchanged as it reduces clutter in the folders and files tree, and makes sure you don’t accidentally delete PowerGREP’s own backup copies that its Undo History depends on.
2. If you already have a text file with a list of files and/or folders that you want search through, click the Import button to show the Import File Listings screen. There you can select one or more text files to read file listings from. Then you can skip ahead to step 9.
3. To include an individual file in the search, click on the file in the tree of files and folders, and then select the Include File or Folder item in the File Selector menu, or click the corresponding button on the File Selector toolbar. A green tick will appear next to the file.
4. To include a folder, and all the files in that folder, click on the folder and use the same Include File or Folder command. A green tick will appear next to the folder. Gray ticks will appear next to the files in the folder.
5. To include a folder, all the files in that folder, and all the files in all subfolders in that folder, click on the folder and then select Include Folder and Subfolders in the File Selector menu. A double green-blue tick will appear next to the folder. Gray ticks will appear next to the files. Double gray tick will appear next to the subfolders.
6. To exclude a file that has a gray tick because you included its folder, click on the file and select Exclude File or Folder from the menu.
7. To exclude folder that has a double gray tick because you included its parent folder, click on that folder and select Exclude File or Folder. Files and folders in that folder will be excluded as well.
8. If you change your mind about including or excluding a file or folder, click on it and then select Clear File or Folder. To remove all markings, select the Clear item in the File Selector menu.
9. Certain file formats may need to be converted to plain text before they can be searched through in a meaningful way, or at all. Select a suitable configuration in “file formats to convert to plain text”. “Proprietary formats” converts formats like PDF or DOC that require conversion. “All formats” also converts formats like HTML or RTF that are more readable when converted. When searching through email, use one of these two choices if you don’t want to search through attachments. Otherwise, choose “attachments & proprietary formats” or “Attachments & all formats” instead. When doing a search-and-replace, you need to disable read-only converters. Do so by selecting “writeable proprietary formats”, “all writable formats”, “attachments & writable proprietary formats”, or “Attachments & all writable formats”. Alternatively, choose “None” to skip all files that can’t be searched through without conversion. The three “compound documents” configurations as well as the “(unused)” choice are for advanced users.
10. If your files may be stored in archives such as ZIP files, mailboxes such as MBOX or PST files, or disk images such as ISO files, set “archive formats to search inside” to a configuration that enables searching inside archives, mailboxes, and/or disk images. PowerGREP then treats files in enabled archive, mailbox, and disk image formats as folders. Files in disabled formats are skipped. Select “None” if you want to skip all such formats.
11. Since computers deal with numbers rather than with text, plain text files use one of various Unicode or legacy encodings or code pages to map those numbers to human-readable text. Set “text encodings to read files with” to “specific auto detection” to have PowerGREP detect the appropriate encoding for each file as much as possible. If you have text files saved by old DOS or mainframe applications or on Windows computers using a different default code page than your own, you will likely need to edit this configuration or create a new one to specify which code pages those files use.
12. Files that look like they don’t contain human-readable text are skipped unless you turn on “search through binary files”. You can have all files treated as binary by turning on that option and setting “text encodings to read files with” to “all files as binary”. If you do that, then you probably want to set “file formats to convert to plain text” to “(unused)”.
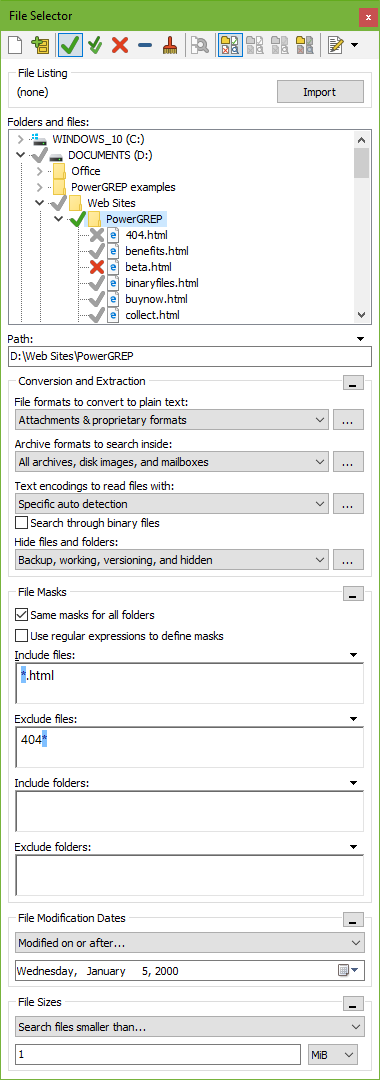
13. If you want to search through files of particular types only, enter a semicolon-delimited list of file types in the “include files” box. Enter *.txt;*.html, for example, to search through text files and HTML files only. All other files lose their gray tick marks in the folders and files tree. To exclude certain types of files, enter their file types in the “exclude files” box. Those files get gray X marks in the folders and files tree. The File Selector reference explains the file masks you can use in the include files and exclude files boxes in full detail.
14. If you only want to search through recently modified files, select “modified during the past...” in the File Modification Dates section. Then you can enter the number of hours, days, weeks, months or years. Other date options allow you to restrict the search to files last modified during a certain date range.
15. Finally, if you only want to search through files of certain sizes, specify the sizes you want in the File Sizes section.
The next step is to define the action you want to run on the files you just marked.
After running the search, you can further narrow down the search results with the Mark Files Based on Results command or the Search Only through Files with Results option.