The File Selector menu lists commands for use with the File Selector. See the File Selector reference topic for more information on the File Selector itself.
Removes all markings from all files and folders. Restores all conversion and extraction configurations to their defaults. Removes all file masks. Changes the file size and file date settings to allow all sizes and dates.
Loads the file selection from a PowerGREP file selection file that you previously saved. PowerGREP action files and PowerGREP results files also contain file selection information. If you select an action or results file, only the file selection information will be read from the file.
You can quickly reopen a recently opened or saved file selection by clicking the downward pointing arrow next to the Open button on the File Selector toolbar. Or, you can click the right-pointing arrow next to the Open item in the File Selector menu. A new menu listing the last 16 opened or saved files will appear. Select “Maintain List” to access the last 100 files.
Save the current file selection into a PowerGREP file selection file. You will be prompted for the file name each time.
All settings you made in the File Selector will be saved. That includes file markings, file masks, and the options to search through archives or binary files.
If you often open the same files, you should add them to your favorites for quick access. Before you can do so, you need to save the file selection to a file. PowerGREP’s window caption will then indicate the name of the file selection file. Click the downward pointing arrow next to the Favorites button on the File Selector toolbar, or the right-pointing arrow next to the Favorites item in the File Selector menu. Then select “Add Current File Selection” to add the current file selection file to the favorites. Pick a file from the menu to open it.
If you click the Favorites button or menu item directly, a window will pop up where you can organize your file selection favorites. If you have many favorites, you can organize them in folders for easier reference later.
By default, the Favorites button is not visible on the toolbar. To make it visible, use View|Lock Toolbars to unlock the toolbars if you haven’t already. Then click on the downward pointing arrow at the far right end of the File Selector toolbar. A menu will pop up where you can toggle the visibility of all toolbar buttons. When you’re done, you can lock the toolbars again to prevent accidental changes.
Marks the file or folder you selected in the folders and files tree for inclusion in the next action. A green tick mark appears next to the file or folder, indicating it is marked for inclusion in the next action. The toolbar button stays down to indicate that the currently selected file or folder is included. When you include a folder, gray tick marks will appear next to all files in the folder. The gray marks indicate the files are indirectly included, because you marked the folder. Files in subfolders of the included folders will not be included.
Marks the folder you selected in the folders and files tree for inclusion in the next action. A double green tick mark appears next to the file or folder, indicating it is marked for inclusion in the next action. The toolbar button stays down to indicate that the currently selected folder is included along with its subfolders. Gray tick marks appear next to all files in the folder and its subfolders. Double gray tick marks appear next to the subfolders.
Excludes the file or folder you selected in the folders and files tree for inclusion from the next action, indicated by a red X. The toolbar button stays down to indicate that the currently selected file or folder is excluded. If you exclude a folder, all files and subfolders of the excluded folder are excluded too, unless you explicitly mark them for inclusion.
Removes the inclusion or exclusion mark from the file or folder you selected in the folders and files tree. Clearing a file or folder is not the same as excluding it. If you exclude a file or folder, it won’t be search through no matter what. If you clear a file or folder, it may be searched through if you included its parent folder. In that case, a gray tick will appear after you clear the green tick or red X.
Clears the selected folder like the “Clear File or Folder” command, and also clears all files and subfolders in that folder.
This command is only available after you have previewed or executed an action. There are three choices in the submenu. All three remove all inclusion and exclusion marks.
Mark Matched Files then individually marks for inclusion all files in which search matches were found during the previous action. Mark unmatched Files instead individually marks for inclusion all files that were searched through but in which no search matches were found during the previous action. Mark Target Files instead individually marks for inclusion all files that were created or overwritten during the previous action.
This command is only available after you have previewed or executed an action. There are three choices in the submenu.
Exclude Matched Files individually excludes all files in which search matches were found during the previous action. Exclude unmatched Files individually excludes all files that were searched through but in which no search matches were found during the previous action. Exclude Target Files individually excludes all files that were created or overwritten during the previous action.
All excluded files get red X marks next to them. All other files and all folders retain the inclusion or exclusion marks that they had before. Essentially, this command allows you to search again through the same set of files, minus those files in which you just found or did not find some search matches.
Turn on this option to limit the next search to files that are listed in the search results. The files must also be marked for inclusion in the File Selector. If there are no previous search results, this option is ignored. Unlike the Mark Files Based on Search Results command, this option does not change the file selection.
This option is useful to further narrow down search results. E.g. if you first search for “Joe”, and then turn on “search only through files with results” without making any other changes to the file selection, PowerGREP will restrict the search to those files containing “Joe”. If you then search for “Jack”, you will get a list of files containing both “Joe” and “Jack”.
If you know in advance that you only want files with both “Joe” and “Jack”, turn on the “list only files matching all terms” option on the Action panel instead.
Another way to use this option is to speed up executing an action for real after previewing it first. If you know none of the files were modified since you did the preview, turn on this option so PowerGREP doesn’t needlessly search files without matches again.
Show all files and folders in the folders and files tree. Use this mode when deciding which files and folders to include in the next action.
Show only files and folders that are directly or indirectly included, as well as their parent folders and drives, in the folders and files tree. Use this mode to reduce clutter when inspecting the results after you have previewed or executed an action.
Show only files in which search matches were found during the previous action, as well as their parent folders and drives, in the folders and files tree. These files are indicated by “(matched)” after the name of the file. Use this mode to reduce clutter when inspecting the results after you have previewed or executed an action. If no matches were found, the folders and files tree will be blank.
Show only folders in the folders and files tree. All folders are shown. No files are shown. Use this mode when you want to mark folders to be included in the next search and long lists of files are making the folders and files tree unwieldy.
PowerGREP’s File Selector automatically tracks changes to files and folders. Normally, there’s no need to manually refresh the File Selector. Drive letters appear and disappear immediately when you insert and remove drives. When you collapse and re-expand a folder node, that folder is automatically refreshed if Windows notified PowerGREP that files or folders inside that folder were changed. When you execute an action, all files and folders that you marked to be part of the action are automatically refreshed as needed.
The only situation in which PowerGREP’s File Selector won’t be refreshed automatically is in the rare event that Windows does not notify PowerGREP of (all) changes to a particular drive. Should that happen, you can select the Refresh item in the File Selector menu. This tells PowerGREP to discard all information it keeps about files and folders. If you execute an action after refreshing the File Selector this way, PowerGREP will glob all folders in the action again, forcing file listings to be up-to-date.
Opens the selected file in PowerGREP’s built-in file editor. The editor can edit both text and binary files.
If you prefer to use an external editor or application to view or edit the file, first configure the editor or application in the external editors preferences. You can then click on the downward pointing arrow next to the Edit button on the toolbar, or the right-pointing arrow next to the Edit item in the File Selector menu, to open the selected file with that application. The applications that are associated with that file type in Windows Explorer are also listed in the Edit submenu.
If you configured an external editor as the default editor, then the Edit File command will invoke that editor instead of using PowerGREP’s built-in editor. This saves you having to go through the Edit File submenu.
Opens the selected file in EditPad. EditPad is a most convenient text editor. Just like PowerGREP, EditPad has been designed by Jan Goyvaerts and is sold by Just Great Software Co. Ltd. EditPad is available at http://www.editpadpro.com/.
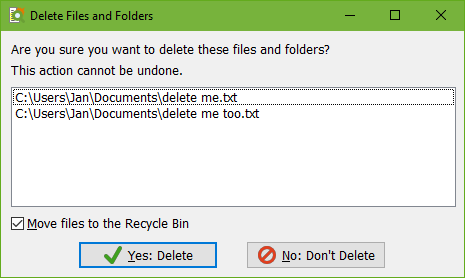
The Delete Files submenu of the File Selector menu allows you to delete four sets of files:
All four options ask for confirmation before actually deleting any files. The confirmation lists the files that will be deleted and gives you the option between moving the files to the Windows Recycle Bin or permanently deleting the files. Neither choice allows you to undo deleting the files in PowerGREP. If you choose to move the files to the Recycle Bin, you can recover the files manually from the Recycle Bin icon on your Windows desktop, at least until you make the Recycle Bin empty.

The Copy Files submenu of the File Selector menu allows you to copy four sets of files:
All four options show a screen listing all files that you are about to copy. You can specify the destination for the copied files and whether backups should be created for any files that are overwritten. These are the same target destination and backup options as on the Action panel.
After the files are copied a new item appears in the Undo History. There you can undo copying the files if you choose to create backups, or if no files were overwritten during the copy operation. The Undo History also allows you to clean up backup files when you’re sure you don’t want to undo the operation.
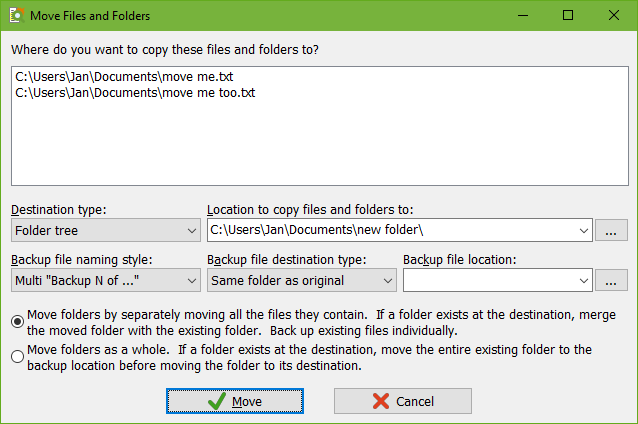
The Move Files submenu of the File Selector menu offers the same options as the Copy Files menu. It shows the same screen with options. The only difference is that the files are moved rather than copied to their new locations. Move operations are also added to the Undo History.