The Sequence panel makes it possible to execute multiple related or unrelated actions in a single sequence. PowerGREP sequences are mainly useful if you regularly run the same same set of PowerGREP actions. If you’re going to execute a particular set of actions only once, it is usually easier to run them one after the other using the File Selector and Action panels. The Sequence panel does not offer any functionality that the File Selector and Action panels don’t offer, other than the ability to easily run the same sequence of actions more than once.
PowerGREP actions can be very powerful. The Action panel provides a ton of options. A single action can use up to five sets of search terms for specific purposes. Each set of search terms can be a list of any number of regular expressions. If you’re used to working with a much more limited grep tool, you may not realize how much you can do with just one PowerGREP action, and you may make things too complicated by using the Sequence panel when it’s not needed.
As a rule of thumb, you only need to use the Sequence panel to run multiple actions if those actions need to work on different sets of files, or on different different subsets of a set of files. The Action panel always uses the files marked in the File Selector. The Sequence panel can associate a different file selection with each of the actions in the sequence.
Suppose you want to replace A with B on drive C: and replace X with Y on drive D:. When doing this just once, you can mark drive C: in the File Selector and then use the Action panel to replace A with B. When that’s done, mark drive D: in the File Selector and then replace X with Y on the Action panel. If you want to be able to repeat this with one click or by invoking PowerGREP from the command line once, you need to use the Sequence Panel. Mark drive C: in the File Selector, and prepare an action to replace A with B on the Action panel. But instead of executing the action, add it to the sequence by clicking the New Step button on the Sequence panel. Then mark drive D: in the File Selector, prepare another action to replace X with Y, and click the New Step button again. Now you can save this sequence or add it to a library to quickly run both replacements in the future.
But if you want to replace A with B and X with Y in a single set of files, you should do so as a single action on the Action panel. Simply set the search type on the Action panel to “list of literal text” or “list of regular expressions”. Then you can add both the A->B and X->Y replacements to the list on the Action panel. Turn off non-overlapping search if you want to make the second replacement work on the results of the first replacement as would happen when you run the two replacements as separate actions. The benefit of using a single action is that each file is opened and saved only once.
A PowerGREP Sequence executes the actions in the sequence independently. There is no way to make a later step in the action use the search matches found by an earlier step in the action, even if both steps work on the same set of files. This is just like executing two actions on the Action panel: the second action doesn’t know anything about the first. If you want to do something like searching for something in a file, and then using that match in a search-and-replace, you need to do that in a single action. PowerGREP’s way of allowing named capturing groups to carry over from one part of the action to the next makes this possible.
The only thing that can be carried over from an earlier step in the sequence to a later step is the file selection, including the ability to make a step process only the files that a previous step searched through, found matches in, did not find matches in, or created as a target file.
Before adding a step to the sequence, use the Action panel to prepare the file selection and action for the step. Then click the New Step button on the Sequence panel. Change the settings on the Action panel as needed for the second step, and click the New Step button again. You can add as many steps to the sequence as you like. Steps are executed strictly from top to bottom. Use the Up and Down toolbar buttons to change their order.
To permanently remove a step from the sequence, click the Delete button on the toolbar. To temporarily disable a step, clear the checkbox next to the step in the list on the Sequence panel.
To edit a step’s action, use the items under the Action button on the Sequence toolbar or in the Action submenu in the Sequence menu. First click Sequence to Action to copy the action from the selected step to the Action panel. Edit the action on the Action panel. Then use Action to Sequence to copy the action from the Action panel to the selected step, replacing the old action.
By default, all steps in the sequence have their “file selection” option set to “File Selector”. That means the step will search through the files marked on the File Selector panel at the time you execute the sequence. This allows you to create sequences that are not tied to a specific set of files. Whenever you want to execute the sequence on a new set of files, just load the sequence on the Sequence panel, prepare a new file selection in the File Selector, and execute the sequence.
You can make the sequence to work on a specific set of files, ignoring the File Selector. Select the first step in the sequence and then click on File Selector to Sequence under Files on the Sequence toolbar. This copies the file selection to the step. The “file selection” setting for the first step then indicates “own file selection”.
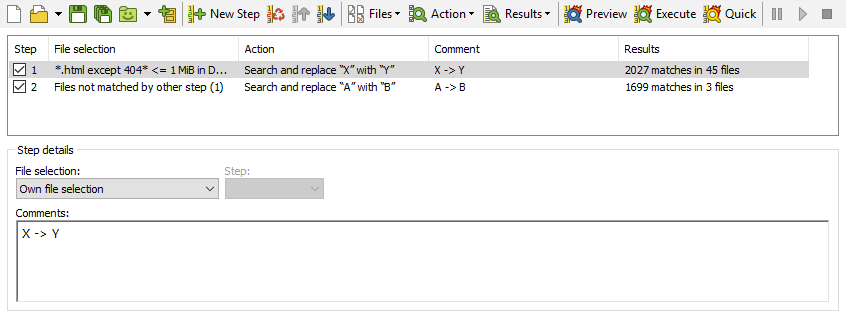
If you want another step in the sequence to work on the same set of files, select that step. Click on the “file selection” drop-down list and choose “file selection from other step”. Then select the step that has its own file selection in the “step” drop-down list. This list indicates steps by the index numbers that they have in the sequence. Those numbers are also shown in the first column of the list of steps. The benefit of copying the file selection to only the first step that uses it and then making all other steps reference it is that you can easily change the set of files that all those steps work on simply by copying a new file selection to the first step.
A step can also work on a subset of the files that were searched through by a previous step. Instead of choosing “file selection from another step” in the “file selection” drop-down list, you can choose:
Click the Preview, Execute, or Quick Execute button on the Sequence toolbar to preview or execute the sequence. The Preview and Execute buttons keep detailed results for each step. Quick Execute only counts search matches and is therefore faster and uses less memory. Previewing a sequence does not modify any files at all. Since the steps in the sequence always run independently, previewing a sequence will not give the same results as executing it if a later step searches through files that would have been created or modified by an earlier step if you had executed the sequence rather than previewing it.
If any of the actions in the sequence create backup files, then the sequence is added as a single item to the Undo History. There you can delete all the backup files created by the sequence or use them to undo the changes made by the sequence. If multiple steps in the sequence modify the same file, only one backup copy is made of that file. Undoing a sequence always undoes all steps in the sequence.
While the sequence runs, PowerGREP updates the Results panel with the results of the step that is being executed. When the last step has completed, the Results panel shows the results of the last step. To see the results of an earlier step, select the step on the Sequence panel and click on Sequence to Results under the Results button on the Sequence toolbar or in the Results submenu in the Sequence menu. This copies the results of the selected step to the Results panel.
If you double-click a step in the sequence, the file selection, action, and results of that step are all copied to the File Selector, Action, and Results panels.
Examples: Replace in file names and contents and Apply an extra search-and-replace to target files